Configuring users
Only ICE administrators at University Hospitals Birmingham NHS Foundation Trust (UHB) can provide ICE usernames and passwords, which are set in staff organisation.
- Select 'Setup' from the toolbar
- Select 'User Policies'
- Select 'Staff Organisation'
- Select the user
- Select 'Amend Staff Details'
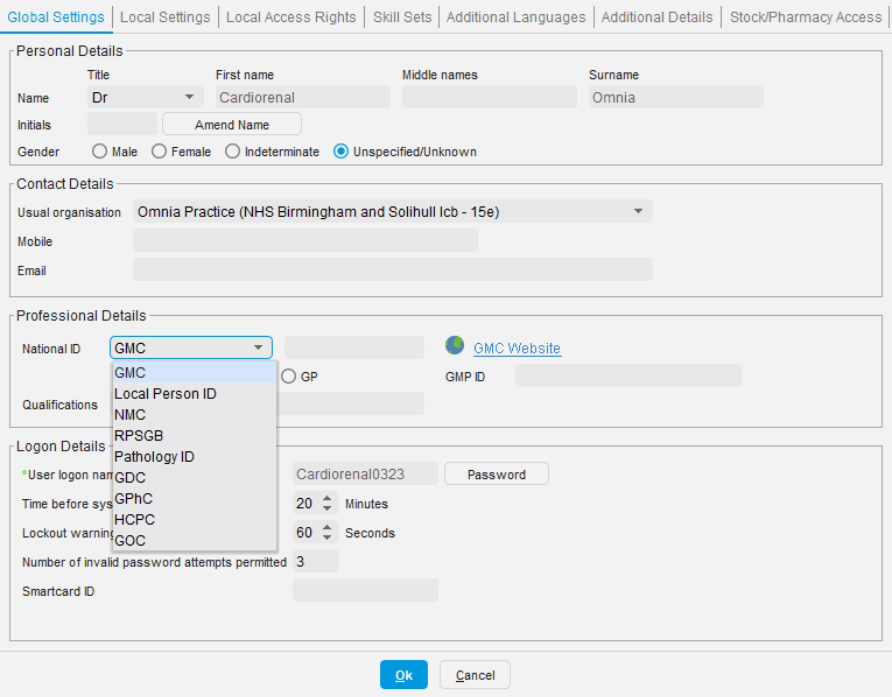
- Click the 'Global Settings' tab in the pop-up window
- In the 'Professional Details' section, select one of the following from the 'National ID' drop-down list:
- 'Local Person ID' (ICE username and password), or
- 'NMC' (nurse practitioner number)
- Enter the username and password as required in the adjacent field
- GPs should select the GP radio button and enter or check that the GMP ID is displayed in the adjacent field (the information provided serves as both the username and the password)
- Click 'OK'
- Save settings
Making a pathology request
- Find a patient
- Open a new consultation
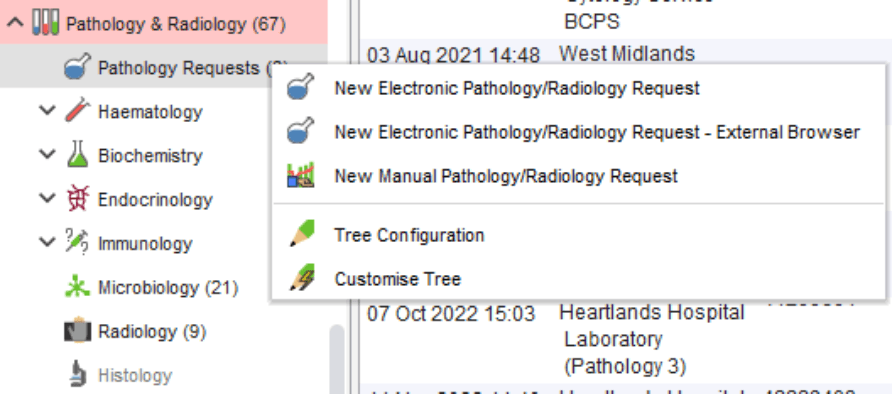
- Expand the 'Pathology & Radiology' option From the 'Clinical Tree'
- Select 'Pathology Requests'
- Select 'New Electronic Pathology/Radiology Request'
- Select the provider 'Heartlands Hospital Laboratory (Pathology)' in the pop-up dialog box*
- The Clinisys ICE system will open up a new session
*GPs may use a number of different pathology providers. When making a new request you will have to select the appropriate provider for the request from the list in the dialog box.
Viewing reports
For quick access to patient pathology results:
- Select 'Patients Reports' on the pathology request window
- The ICE application will launch the report view
Viewing the request list
To see a list of requests that have been made (to edit, delete, reprint or check the status):
- Select 'Update Request'
- The ICE application will launch the patient request list view
Check the ICE connection
- Select 'Setup' on the toolbar
- Select 'User Policy'
- Select 'Organisation & Preference'
- Select 'Pathology'
- Select 'Pathology Requests'
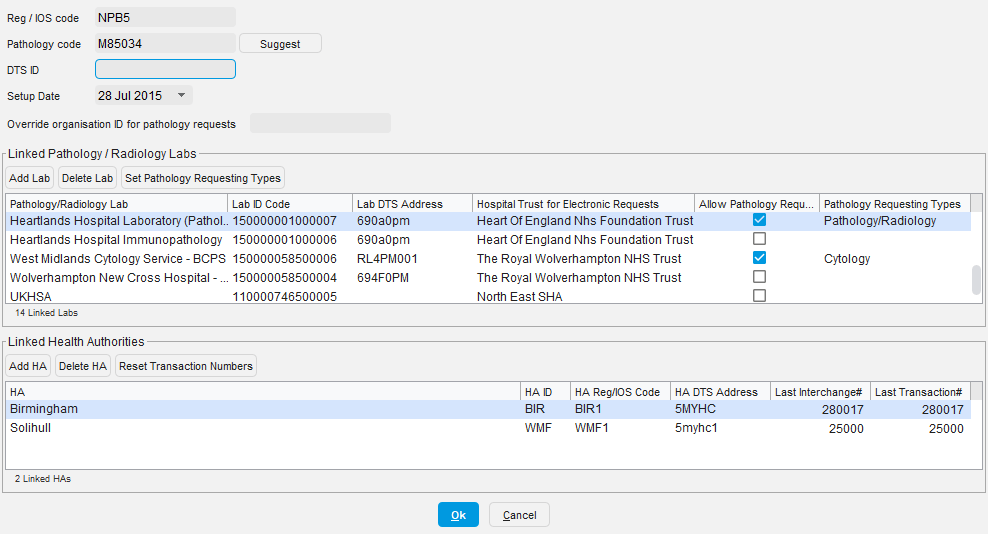
- A list of pathology and radiology providers for all local trusts will be displayed
- Ensure the 'Allow Pathology Request' check box next to the pathology provider is ticked
- Select 'Add Lab' to setup a new provider
- Enter the pathology provider into the search box
- Click 'Search' for pathology provider
- Select the appropriate provider from the search results
Adding a Word document
- Select 'Setup' on the toolbar
- Select 'Referrals and Letters'
- Select 'New Word Letter Templates'
- Select 'New Template'
- Select 'Import an existing Word document'
To use the document:
- Open the patient
- Select 'Communication and Letters'
Adding matching criteria for inbound results
The Pathology Laboratory code is used to match results back to the appropriate clinician. This can be done from the 'Organisation & Preference' section:
- Select 'Setup'
- Select 'User Policy'
- Select 'Organisation & Preference'
- Select 'Staff Matching' to display the current matching rules
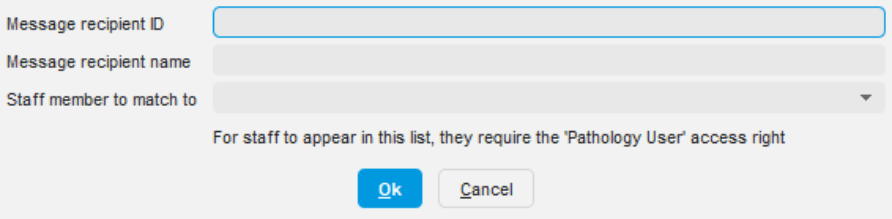
- Select 'New Matching Rule' to create a new rule:
- 'Message recipient ID' is the lab local code
- 'Message recipient name' is a logical name assigned by the GP practice
- 'Staff member to match to' allows the appropriate staff member at the GP practice to be selected
Last reviewed: 24 August 2023